How to Make Roblox UI with AI
How to make Roblox UI with AI: plan the screens, get a look, have AI build real ScreenGuis that scale on phones, add motion, and wire the shop safely.
 RoAutomation teamUpdated 7 min read
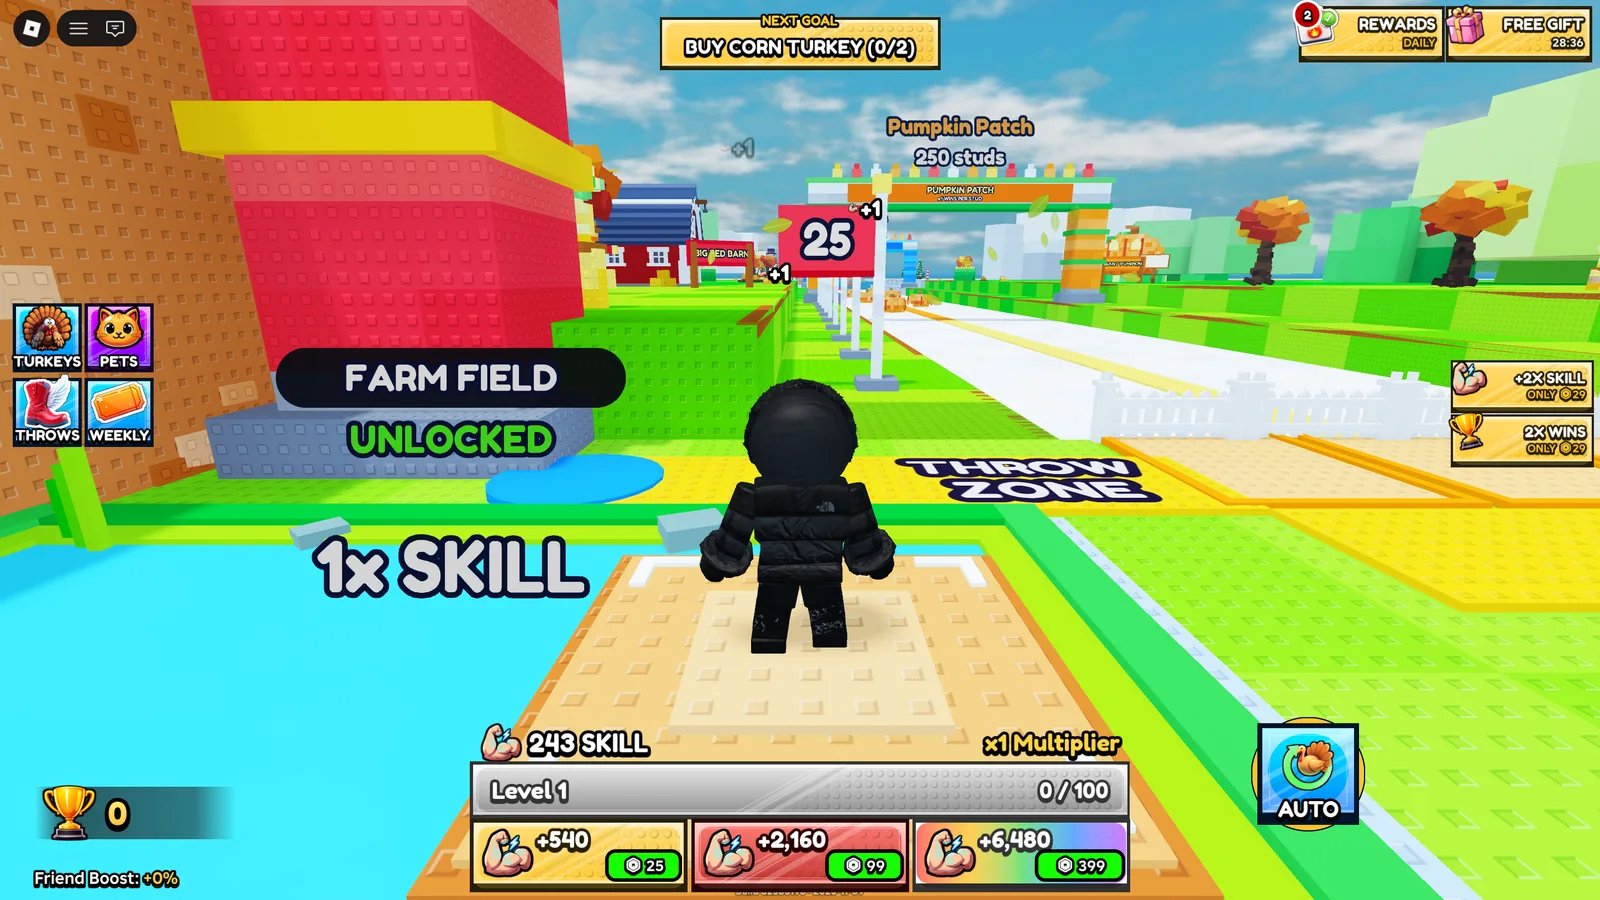
AI can help with Roblox UI in two ways: making the look (mock-ups and icons) and building it as real, working screens in Roblox Studio. The second matters more. Plan your screens, settle one style, then have the AI build each screen as a ScreenGui that uses Scale sizes, anchor points and layout objects so it fits every device. Test at phone size in Studio’s Device Simulator, add short animations, and keep every purchase checked on the server.
Can AI make Roblox UI?
Yes, but be clear about which half you’re asking for. There are two different jobs:
- The look. An image AI can draw a mock-up of a shop, or a set of icons in one style. That is a picture. Roblox can’t run a picture of a shop.
- The build. A coding AI, or an agent working in Studio, creates the real thing: frames, buttons and text objects inside a ScreenGui, with scripts that open it, fill it and send clicks to the server.
A mock-up is useful as a target and as a source of icons. But the work, and most of the bugs, are in the build: making it fit a phone, making the buttons do something, and making it safe. This guide covers both, in the order that wastes the least time.
Step 1: List the screens and pick one style
Write down every screen the game needs, and what each one is for:
- HUD: the main number, the next goal, and the buttons that open menus.
- Shop: passes and products, each with a picture, one line and a price.
- Inventory or collection: what the player owns.
- Reward pop-up: what they just got.
- Settings: music, effects, and anything players ask to turn off.
Then decide one style and write it down, so every screen matches: three or four colours, one or two fonts, how round the corners are, how thick the outlines are, and what a button looks like at rest and when pressed. Look at two or three successful games in your genre for the conventions players expect, and decide what yours does differently. A style written down is a style an AI can follow on the tenth screen as well as the first.
Step 2: Get the look, and make icons as separate images
If you want a mock-up, describe one screen to an image AI with your style notes, or sketch it. Use it as the target, not as the UI itself.
Icons are different: they are real assets. Make each one as its own square image with a transparent background, in one consistent style, then upload them to Roblox as images. Keep the frames, panels and buttons as Roblox objects where you can, with rounded corners and outlines from UICorner and UIStroke. They stay sharp at any size and can be recoloured from one place, where a painted panel image can’t.
Step 3: Have the AI build it so it fits every screen
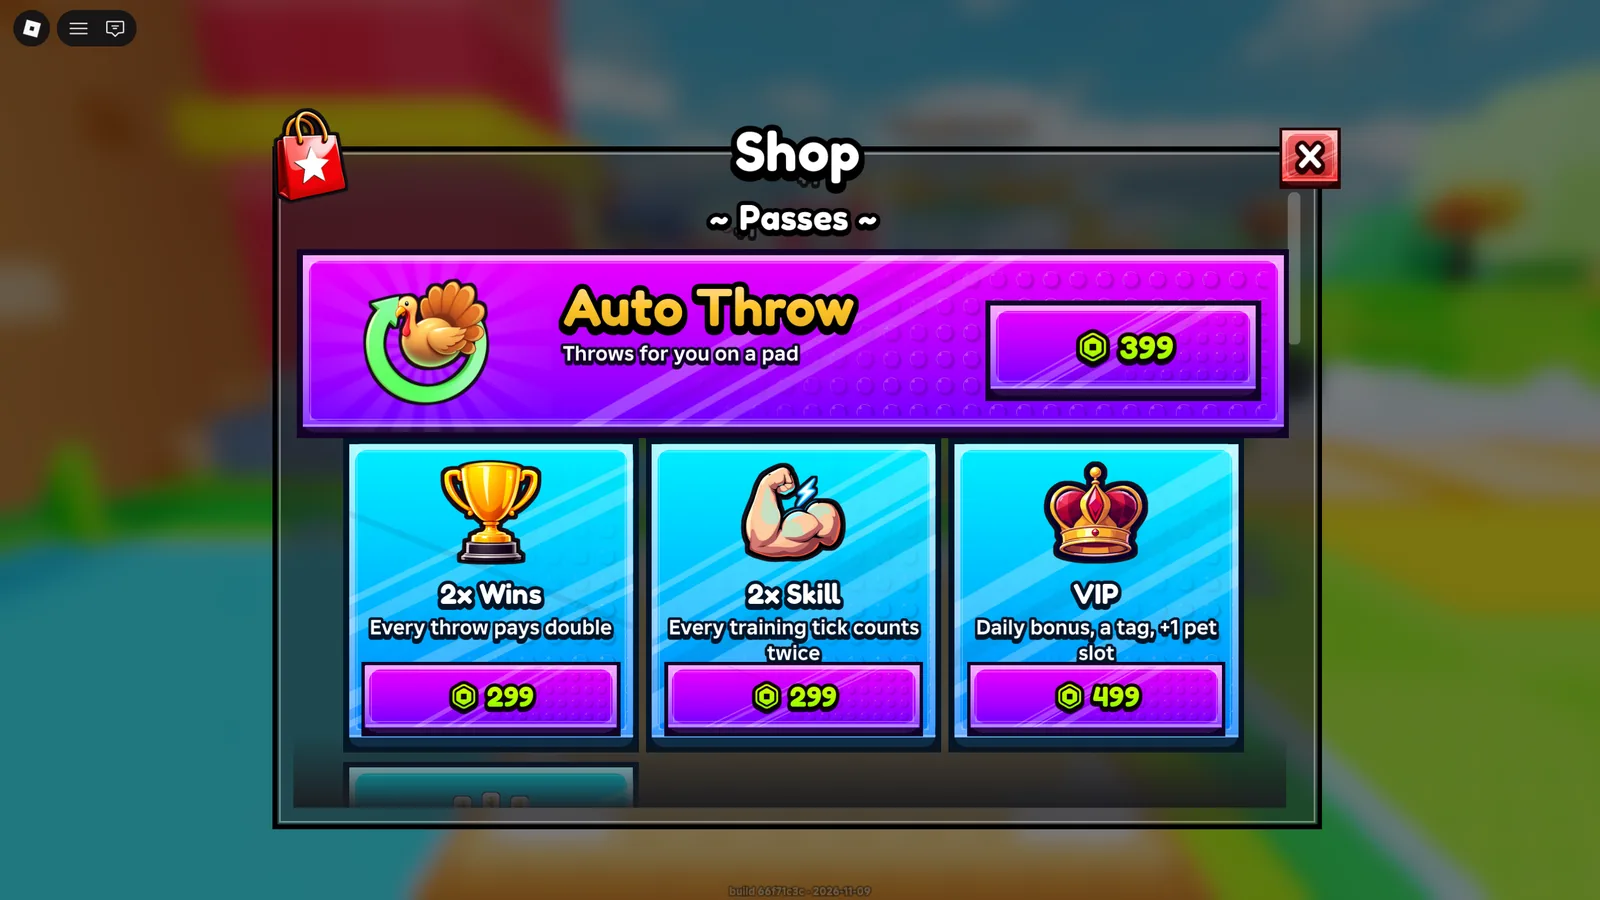
This is where most AI-made UI goes wrong: it looks right on the developer’s monitor and falls apart on a phone. The cause is almost always sizing. In Roblox, every position and size is a UDim2 with two parts. Roblox’s docs describe Scale as a percentage of the container and Offset as a number of pixels. A shop that is 800 pixels wide is wider than many phones. A shop that is 60% of the screen fits all of them.
A prompt that gets a UI that scales:
“Build the shop as a ScreenGui in StarterGui with ResetOnSpawn off. Size and position everything with Scale, not Offset. Give the main panel a UIAspectRatioConstraint so it keeps its shape, and centre it with an AnchorPoint of 0.5, 0.5. Lay out the items with a UIGridLayout and UIPadding. Use TextScaled with a UITextSizeConstraint so text never overflows. Put colours, fonts and corner sizes in one Theme module that every screen reads.”
- AnchorPoint sets which point of an object its position refers to, from 0 to 1. Centre things from their centre, and pin corner buttons from their corner.
- Layout objects (UIListLayout, UIGridLayout) place children for you, so adding a sixth shop item doesn’t mean moving the other five.
- One Theme module means changing the button colour once changes it everywhere.
Step 4: Design for the phone first
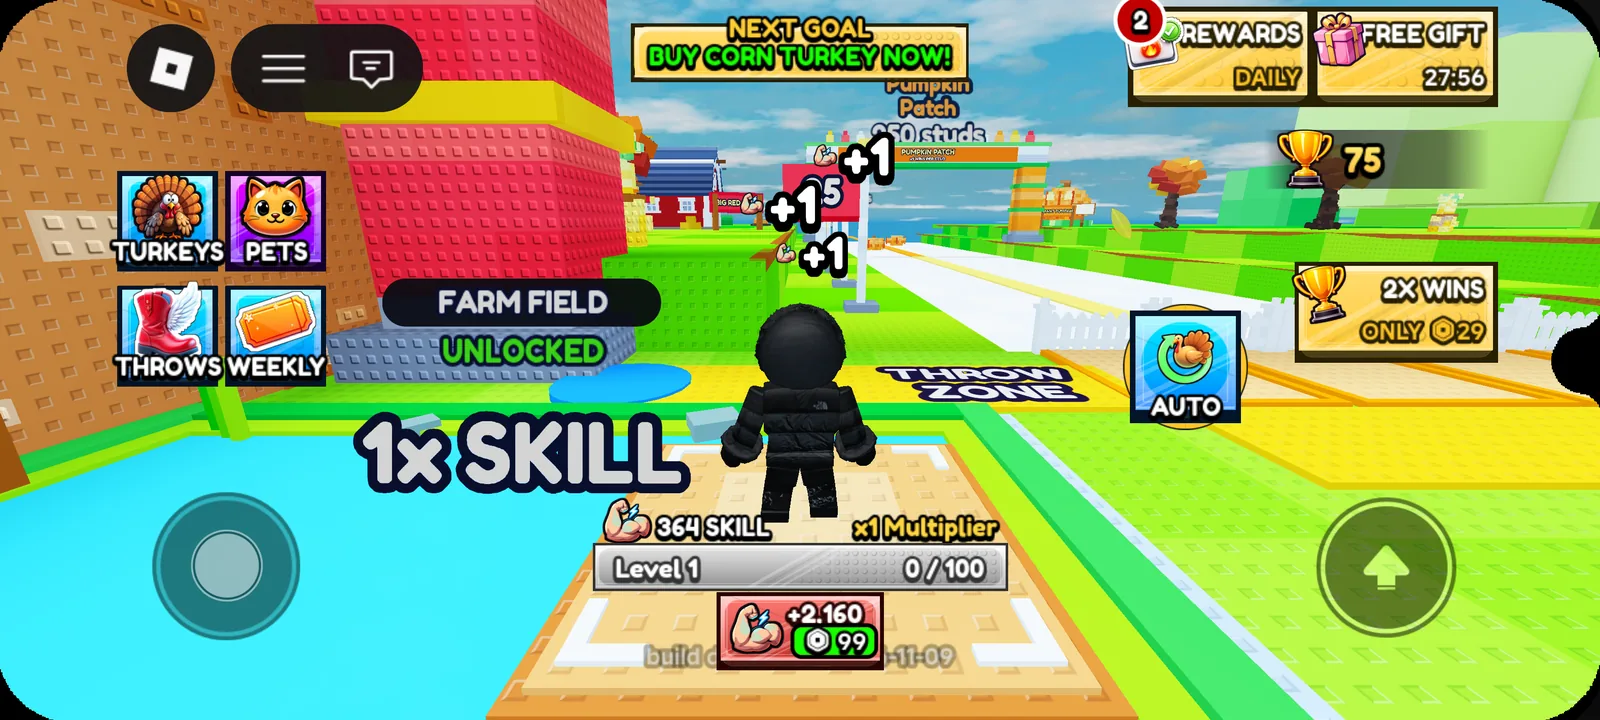
Most Roblox players are on phones, and a phone screen is already busy. Roblox puts its own buttons at the top left, the thumbstick sits at the bottom left and the jump button at the bottom right. Your HUD has to live in what’s left.
- Keep the bottom corners clear for the controls.
- Make every button big enough to hit with a thumb, with space between neighbours.
- Show one pop-up at a time. Two stacked windows on a phone is a wall.
- Keep the HUD small. If a number isn’t needed every second, put it in a menu.
- Respect the notch and rounded corners: keep content inside the safe area.
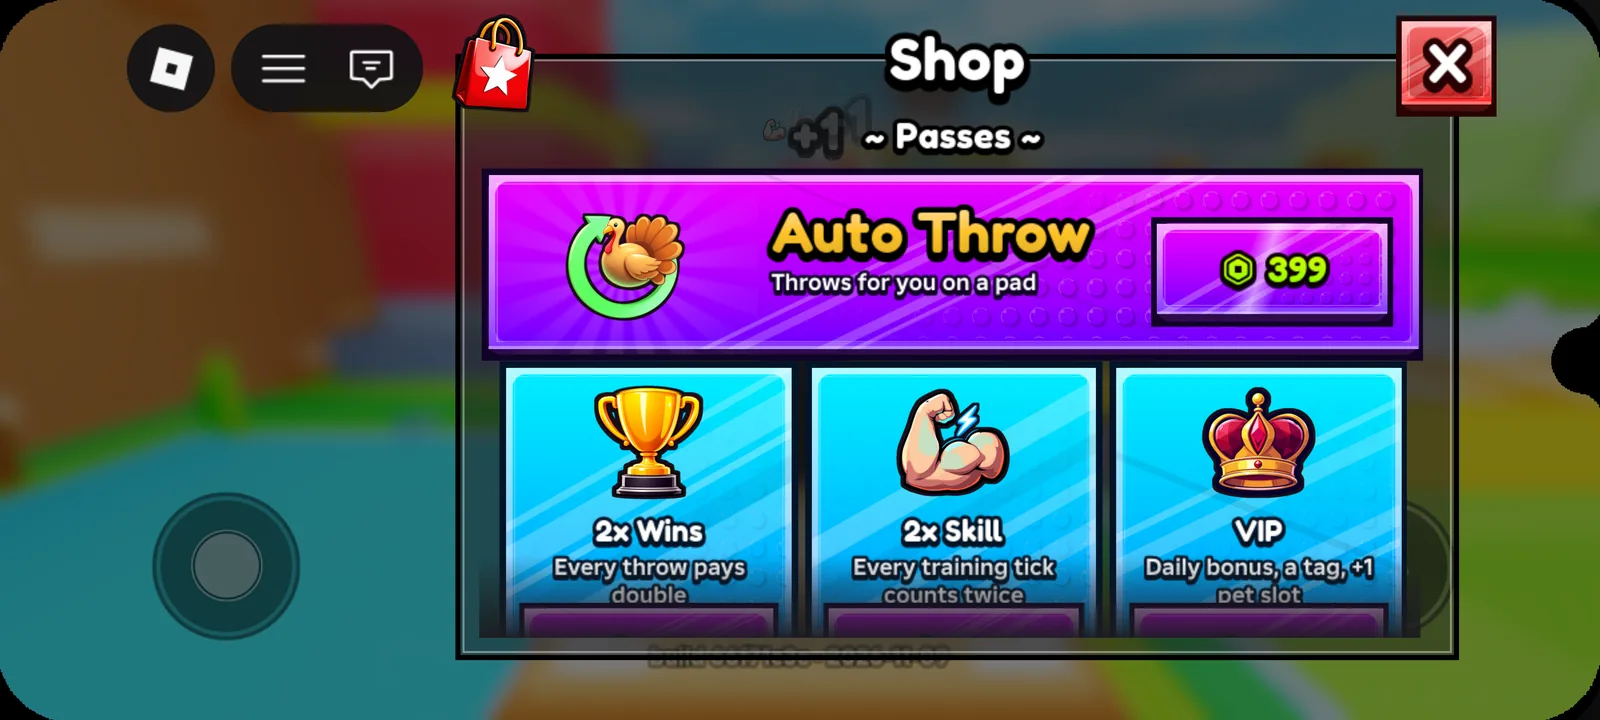
You don’t need a drawer of phones to check this. Studio’s Device Simulator previews your game at a device’s screen size with touch controls. Run every screen through a small phone, a large phone and a tablet before you call it done.
Step 5: Add motion and sound
What separates a polished Roblox UI from a debug menu is mostly motion. Ask for it by name:
- Buttons grow slightly on hover and shrink on press, with a click sound.
- Windows pop open from slightly smaller and fade out when closed, in a fraction of a second.
- Numbers count up to their new value instead of jumping.
- Rewards arrive with a burst, a sound and a moment of pause.
All of it is TweenService and a few sounds. Keep animations short. A menu that takes a second to open feels broken by the tenth time.
Step 6: Wire it up safely
UI runs on the player’s device, and anything on the player’s device can be tampered with. So the UI only asks, and the server decides:
- A Buy button sends a request. The server checks the price and the player’s balance, then grants the item.
- Robux purchases go through Roblox’s own purchase prompts. Roblox’s docs describe passes as a one-time purchase for a permanent privilege, and developer products as items that can be bought more than once.
- The server grants what was bought, and the UI updates from the server’s answer, never from the click.
- If you sell anything random for Robux, Roblox requires the odds to be shown before the purchase.
Real UI our agents built
The screens on this page are not mock-ups. They are the working HUD and shop of a simulator built by RoAutomation’s agents, captured in Roblox Studio on PC and at phone size. The same shop holds its shape on both, and the HUD keeps the corners clear for the controls.
In RoAutomation, Frame is the agent that builds UI: real screens in your own Roblox Studio, with the motion and sound that make a click land. Merchant designs what the shop sells. Playtest and the Kid Tester then open every screen on PC, phones and a gamepad and send back anything that overlaps, overflows or can’t be reached. You see the result as pictures and approve it.
See the plans to put that team on your game. If you have a game live, the free Game Review will tell you what to fix first.
Questions people ask
Can AI make a Roblox GUI?
Yes. An image AI can draw mock-ups and icons, and a coding AI or an agent in Roblox Studio can build the real ScreenGui with its frames, buttons and scripts. The built version is the one players can use.
How do I make Roblox UI fit all screen sizes?
Size and position with Scale instead of Offset, add a UIAspectRatioConstraint to keep panels in shape, use anchor points and layout objects, and test in Studio’s Device Simulator at phone and tablet sizes.
What is the difference between Scale and Offset in Roblox?
Roblox’s docs describe Scale as a percentage of the container’s size and Offset as a number of pixels. Scale adapts to the screen; Offset stays the same size on every device.
Can I turn a UI image into a working Roblox UI?
Not directly. An image is a target to rebuild from. The frames, text and buttons have to be made as Roblox objects and scripted, though icons from the image can be uploaded and used.
How do I make Roblox UI look professional?
Keep one consistent style, give buttons hover and press feedback, animate windows opening and numbers changing, add click sounds, show one pop-up at a time and keep the HUD small on phones.